Getting your tiny computer to do things when you are not right there can feel like a bit of a trick, but it is actually pretty straightforward, and guess what, it does not have to cost you anything at all. Lots of folks have these little machines, like the Raspberry Pi, sitting somewhere, maybe running a small server, keeping an eye on things at home, or even just being a fun project. Being able to get to it from somewhere else, say, from your phone while you are out, or from another computer across the house, really opens up what you can do with it, you know?
This whole idea of reaching your Pi from far away without spending money is something many people wonder about, and there are, in fact, several ways to make it happen, pretty much for anyone who wants to give it a try. You might have heard about complicated setups, but many of the simplest methods are, in a way, the most effective for everyday tasks. It just takes a little bit of setting up, and then you are pretty much good to go.
Whether you are looking to check on a sensor reading, start a program, or just poke around in the files on your little computer, doing it from a distance makes things so much more convenient. This guide will walk you through some of the popular ways to make that connection, helping you get your Raspberry Pi working for you, no matter where you happen to be at the moment. It is, to be honest, a pretty neat capability to have.
- How Old Was Justin Bieber When He Sang Baby
- Amanda Peet
- Short Bio Example Yourself
- Katherine Kady Allen
- Manolo Gonzalez Vergara
Table of Contents
- What is Remote Access for Your Raspberry Pi?
- Why Would You Want to Access Pi Remotely Free?
- Getting Started - Essential Steps for Access Pi Remotely Free
- Are There Other Ways to Access Pi Remotely Free?
- Considering Security When You Access Pi Remotely Free
- Troubleshooting Common Issues for Access Pi Remotely Free
What is Remote Access for Your Raspberry Pi?
Remote access, when we talk about your Raspberry Pi, simply means being able to control or use your Pi from another device, like a laptop, a desktop computer, or even a phone, without being physically connected to it. This could mean your Pi is in another room, another building, or even another country. The idea is to send commands, receive information, or see what is happening on its screen, all from a distance, so to speak. It is like having a really long invisible cable connecting you to your Pi, which is pretty cool, if you ask me.
This type of connection often happens over a network, like your home Wi-Fi or the internet itself. There are different ways to set up this connection, each with its own benefits depending on what you want to achieve. Some methods let you type commands into a text-based window, while others give you a full graphical view of your Pi's desktop. All of these methods, pretty much, allow you to interact with your little computer as if you were sitting right in front of it, which is, honestly, a great convenience.
The beauty of it all is that many of the most useful ways to get this kind of access do not cost you anything extra beyond the Pi itself and a network connection. This makes it a very appealing option for hobbyists, students, and anyone wanting to get more out of their small computing device without adding to their expenses. It is, in some respects, a core part of what makes these single-board computers so versatile, allowing you to place them in out-of-the-way spots and still have complete control.
Why Would You Want to Access Pi Remotely Free?
There are quite a few good reasons why someone would want to get to their Raspberry Pi from a distance, without having to pay for the connection tools. For one thing, your Pi might be in a place that is not easy to get to, like tucked away in a closet, up in an attic, or even outside as part of a weather station. Constantly plugging in a monitor, keyboard, and mouse every time you want to make a change or check something would just be a real hassle, would it not? Being able to reach it from your main computer makes life a lot simpler, basically.
Another big reason is automation. Many people use their Raspberry Pi for projects that run by themselves, like home automation systems, security cameras, or media servers. If something goes wrong, or if you just want to tweak a setting, you need a way to get in there without physically touching the device. Remote access provides that very link, allowing you to troubleshoot or update things from anywhere, which is, in fact, incredibly useful for these kinds of setups. You can, for instance, restart a service or check log files without ever leaving your couch.
Then there is the matter of convenience and learning. For those just starting out with computing projects, or even seasoned makers, having remote access means you can work on your Pi from the comfort of your usual workspace, using your preferred keyboard and large screen. It also means you can show off your projects or get help from someone else who can connect to your Pi from their own location, making collaboration a bit easier. It is, pretty much, about making your experience with the Pi as smooth and as flexible as possible, giving you more freedom in how you use it.
Getting Started - Essential Steps for Access Pi Remotely Free
Before you can even think about reaching your Raspberry Pi from another spot, there are a few basic things you need to have in place. First off, your Raspberry Pi needs to be up and running, with an operating system installed, usually Raspberry Pi OS. It also needs to be connected to a network, either through an Ethernet cable or Wi-Fi. This network connection is, of course, how your other device will talk to it, so it is quite important. You will also need to know your Pi's IP address on your local network, which is like its street address for other devices to find it. You can usually find this by typing `hostname -I` into the Pi's terminal, if you are sitting at it, or by checking your router's connected devices list, so that is a good first step.
Next, you will need to make sure certain services are turned on on your Raspberry Pi. The most common and, in a way, fundamental service for remote access is SSH, which stands for Secure Shell. This allows you to open a command-line interface to your Pi from another computer. If you are using a recent version of Raspberry Pi OS, SSH might be turned off by default for security reasons. You can turn it on using the Raspberry Pi Configuration tool under "Interfaces" or by typing `sudo raspi-config` in the terminal and going to "Interface Options," then selecting "SSH." This is, honestly, a very simple but necessary change to make.
Finally, you will need a way to connect from your other device. For SSH, this means using a terminal application on a Linux or macOS computer, or a program like PuTTY if you are on Windows. These tools are, for the most part, free to use and widely available. Once these initial preparations are done, you are, in fact, ready to try making that first remote connection. It is, to be honest, less complicated than it sounds once you get the hang of it, and it really opens up a lot of possibilities for how you use your Pi.
Setting Up SSH for Access Pi Remotely Free
Setting up SSH, or Secure Shell, is probably the most common and, in some respects, the most straightforward way to get command-line access to your Raspberry Pi from a distance, all without paying a dime. Once you have made sure SSH is enabled on your Pi, as mentioned earlier, the next step involves connecting from your other computer. If you are on a Linux machine or a Mac, you already have a terminal program that can do this. You just open it up and type `ssh pi@YOUR_PI_IP_ADDRESS`, replacing the placeholder with the actual IP address of your Raspberry Pi. For instance, it might look like `ssh pi@192.168.1.100`. This is, pretty much, the core command.
When you connect for the very first time, your computer might ask you to confirm the authenticity of the Pi you are connecting to. Just type 'yes' and press Enter. Then, it will ask for the password for the 'pi' user on your Raspberry Pi. The default password is 'raspberry', but you should really change this to something more secure for your own safety, which is, you know, just good practice. Once you enter the correct password, you will see the Pi's command prompt, and you are, in fact, remotely connected. You can now type commands just as if you were sitting right at the Pi itself, which is quite handy.
For Windows users, a program called PuTTY is the go-to tool for SSH connections. You can download it for free from its official website. Once installed, you simply open PuTTY, enter your Pi's IP address in the "Host Name (or IP address)" field, make sure the "Port" is set to 22 (which is the standard for SSH), and select "SSH" as the connection type. Then, you click "Open." A new window will pop up, asking for your username (usually 'pi') and then your password. Just like with Linux/Mac, you will be given a command line to interact with your Raspberry Pi, making it very easy to access Pi remotely free, even from a Windows machine. It is, honestly, a very reliable method.
Are There Other Ways to Access Pi Remotely Free?
While SSH is great for command-line tasks, sometimes you might want to see your Raspberry Pi's graphical desktop environment, just like you would if you had a monitor plugged in. This is where other free remote access methods come into play. One very popular option is VNC, or Virtual Network Computing. This allows you to view and control the Pi's graphical interface from your other device, which is, in a way, a much more visual experience. There are also methods that let you run web servers on your Pi, so you can access certain applications or information through a web browser from anywhere, which is pretty neat. Each method serves a slightly different purpose, giving you options depending on what you are trying to do, so that is something to keep in mind.
Another approach involves setting up a simple web server on your Raspberry Pi. This means you can create web pages or applications that your Pi hosts, and then you can access them from any web browser on your network, or even over the internet if you configure your router for it. This is particularly useful if you are building something like a smart home dashboard or a data logger that displays information in a browser. There are many free web server software options available for the Pi, like Apache or Nginx, making this a very accessible way to get to certain functions of your Pi without direct desktop access. It is, basically, about making your Pi's capabilities available through a familiar web interface.
For more advanced or specific uses, you might consider setting up a VPN (Virtual Private Network) server on your Pi. This turns your Pi into a secure gateway to your home network, allowing you to access all devices on your network, including your Pi, as if you were physically at home. While setting up a VPN can be a bit more involved, there are free software packages like OpenVPN that make it possible, and it offers a very high level of security and flexibility for access Pi remotely free. This method is, in fact, ideal for those who need to securely reach multiple devices within their home network from outside, providing a truly private connection.
Using VNC for Visual Access Pi Remotely Free
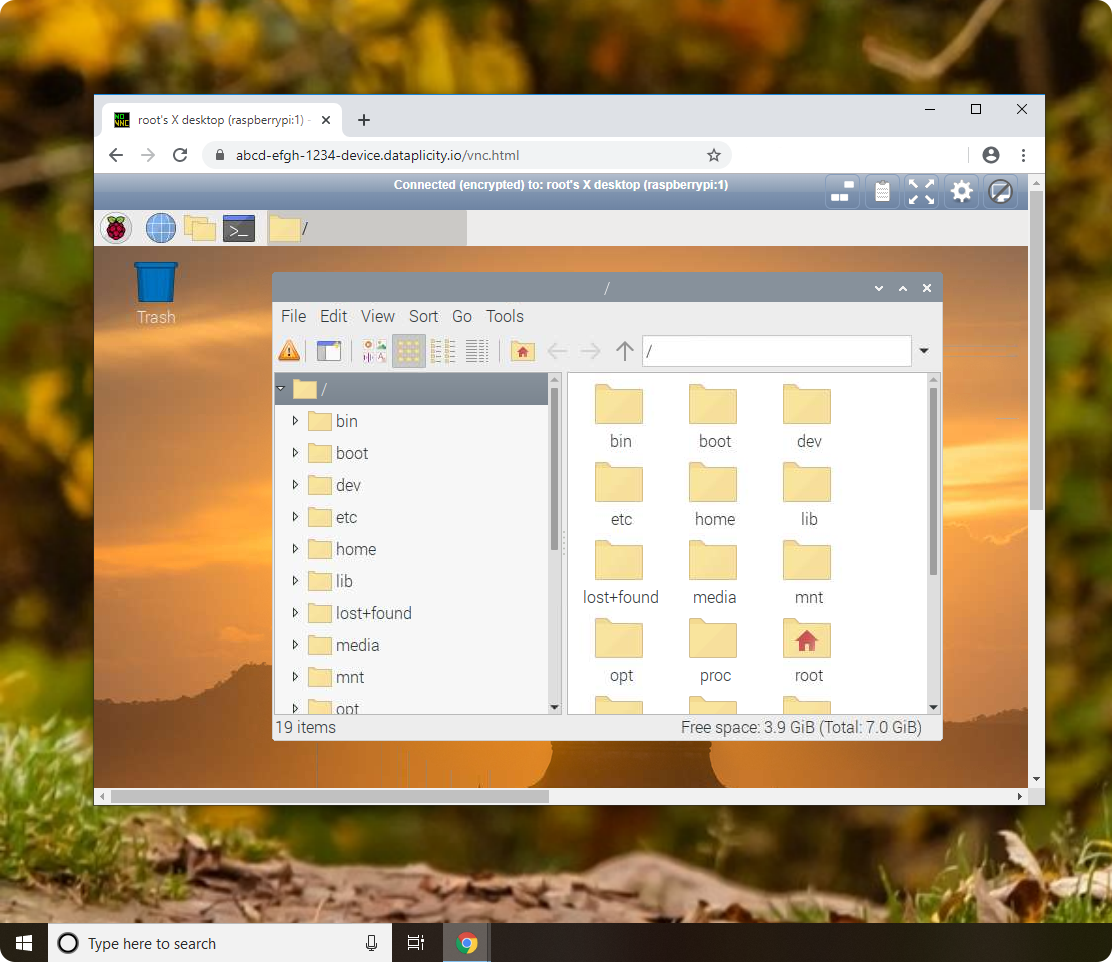
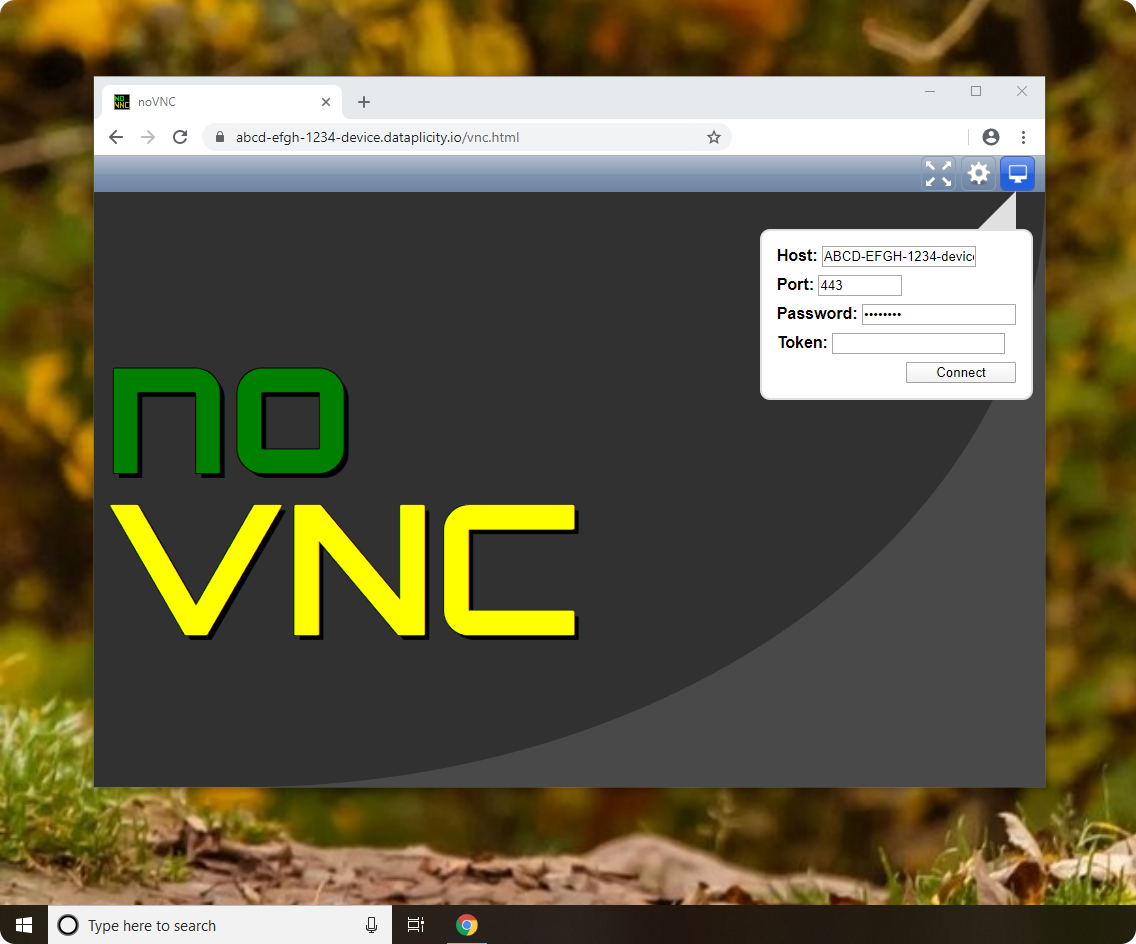
If seeing your Raspberry Pi's desktop is what you are after, VNC is, arguably, the best free solution. Just like with SSH, you first need to enable the VNC server on your Raspberry Pi. You can do this through the Raspberry Pi Configuration tool (under "Interfaces") or by typing `sudo raspi-config` in the terminal and selecting "Interface Options," then "VNC." Once enabled, the VNC server will start running on your Pi, ready to accept connections. This is, you know, the main switch to flip to get things going visually. The VNC server might even tell you the IP address and display number to use, which is helpful.
On your other computer, you will need a VNC viewer application. There are many free VNC viewers available for Windows, macOS, Linux, and even mobile devices. RealVNC Viewer is a popular choice, and it is free for personal use. Once you have the viewer installed, you open it up and enter the IP address of your Raspberry Pi, often followed by `:1` if it is the first display. For example, `192.168.1.100:1`. The viewer will then prompt you for the username (usually 'pi') and password you set up for your Pi. This is, pretty much, the standard procedure for connecting visually.
After successfully entering your details, you will see your Raspberry Pi's desktop appear in a window on your other computer. You can then use your mouse and keyboard to control the Pi just as if you were sitting right in front of it. This is incredibly useful for graphical applications, browsing the web on your Pi, or simply getting a visual confirmation of what is happening. It makes managing your Pi's graphical environment very easy and allows for a much richer interaction than just the command line, making it a truly effective way to access Pi remotely free for those who prefer a visual interface.
Considering Security When You Access Pi Remotely Free
While the idea of reaching your Raspberry Pi from anywhere without cost is pretty appealing, it is really important to think about security. When you open up your Pi to remote connections, you are, in a way, creating a door into your device, and potentially into your home network. So, making sure that door is secure is, honestly, a very big deal. The first and most important step is to change the default password for the 'pi' user (which is 'raspberry') to something strong and unique. A strong password includes a mix of upper and lower case letters, numbers, and symbols, and it should be fairly long. This is, basically, your first line of defense against unwanted visitors, so do not skip it.
Beyond changing your password, you should also consider setting up SSH key-based authentication instead of just using passwords. This is a more secure method where you use a pair of cryptographic keys – one public key on your Pi and one private key on your connecting computer. This way, you do not have to type your password every time, and it is much harder for someone to guess their way in. There are plenty of free guides online explaining how to set this up, and it is, in fact, a really good practice for anyone serious about security. It adds, in some respects, an extra layer of protection that is well worth the effort.
If you are planning to access your Pi over the internet (not just within your home network), you will need to configure your router to forward ports, which can be risky if not done carefully. A safer alternative for internet access is to use a VPN or a service like ngrok (which has free tiers for basic use). These services create a secure tunnel to your Pi without directly exposing it to the open internet, which is, you know, a much safer approach. Always keep your Raspberry Pi's operating system and any installed software updated, as updates often include security fixes. Regularly updating is, essentially, like patching holes in your security fence, keeping your Pi safe while you access Pi remotely free.
Troubleshooting Common Issues for Access Pi Remotely Free
Even with the best intentions, you might run into a few bumps when trying to access your Raspberry Pi from a distance without paying. One of the most common issues is simply not being able to connect at all. The first thing to check is always your Pi's network connection. Is it powered on? Is the Wi-Fi connected, or is the Ethernet cable plugged in properly? Can you 'ping' your Pi's IP address from your connecting computer? If you cannot, then the network connection is, pretty much, the place to start looking for problems. Sometimes a simple reboot of the Pi or your router can clear up minor network glitches, so that is worth a try.
Another frequent problem is related to the IP address. Raspberry Pis often get a new IP address from your router each time they restart, which can make it hard to find them. You can set up a static IP address for your Pi in your router settings or on the Pi itself, which means it will always have the same address. This makes it much easier to consistently access Pi remotely free without having to hunt for its new address every time. Alternatively, you could use a hostname instead of an IP address, which some network setups allow, making it even simpler to remember where your Pi is on the network, which is, in fact, a very convenient feature.
If you are trying to connect via SSH or VNC and it is just not working, double-check that the SSH or VNC server is actually enabled on your Pi. Sometimes, after an update or a fresh install, these services might be turned off by default. Also, make sure you are using the correct username and password. It sounds obvious, but a tiny typo can stop a connection dead in its tracks. Firewall settings on either your Pi or your connecting computer can also block connections, so you might need to adjust those if all else fails. Taking things one step at a time and checking each part of the connection process will, usually, help you find the source of the issue, getting you back to controlling your Pi from afar.
Getting to your Raspberry Pi from another spot without spending extra money is, in fact, a very practical skill that opens up many possibilities for your projects and daily uses. We have gone over how remote access works, why it is so useful, and the initial preparations you need to make. We also talked about setting up SSH for command-line control and VNC for a visual desktop experience, both of which are free methods. Lastly, we covered some important security considerations and common troubleshooting tips to help you get things working smoothly. By following these steps, you can confidently manage your Raspberry Pi, no matter where you happen to be.
Related Resources:

Detail Author:
- Name : Malvina Reynolds
- Username : ismael40
- Email : jena74@gmail.com
- Birthdate : 1998-04-20
- Address : 322 Nader Wells North Caitlyn, IL 21291
- Phone : +1-231-266-7791
- Company : Mertz PLC
- Job : Chemical Plant Operator
- Bio : Placeat eveniet eaque aut commodi et magni dolor. Eius esse quasi provident id sed. Dicta suscipit dolor officia.
Socials
facebook:
- url : https://facebook.com/ava1029
- username : ava1029
- bio : Temporibus animi quod aut quis. Autem rerum quo qui.
- followers : 3978
- following : 159
twitter:
- url : https://twitter.com/manna
- username : manna
- bio : Eligendi id sit sunt iusto. Enim ratione fugiat atque in omnis omnis qui. Non fugiat consequuntur temporibus et provident eaque.
- followers : 3292
- following : 2430
linkedin:
- url : https://linkedin.com/in/ava_official
- username : ava_official
- bio : Quod quia hic tempore.
- followers : 2383
- following : 1868
